Before the Crate.io team started developing Crate, we faced one and the same problem over and over again: scaling the database backend the same way as application servers could scale. A lot of database solutions provide an easy start with a single node setup, but when data grows and you have to think about how to scale the backend beyond one node things become difficult very quickly.
One major goal at Crate.io is to provide a database solution that is as easy to maintain with one node as with multiple nodes, and to keep the administration overhead as little as possible.
In this blog post I'd like to illustrate how to use Crate in a multi-node setup and point out the key settings to run the cluster smoothly.
Shared Nothing Architecture
Crate is designed in a shared nothing architecture, in which all nodes are equal and each node is independent self-sufficient. That means that nodes work on their own, and all nodes in a cluster are configured equally, the same way as they would be as a single-node instance. Having this in mind you'll design your architecture differently to conventional setups.
Old/Conventional Setup
Let's assume we have a scenario with three app servers that are connected to single database master with three slaves.
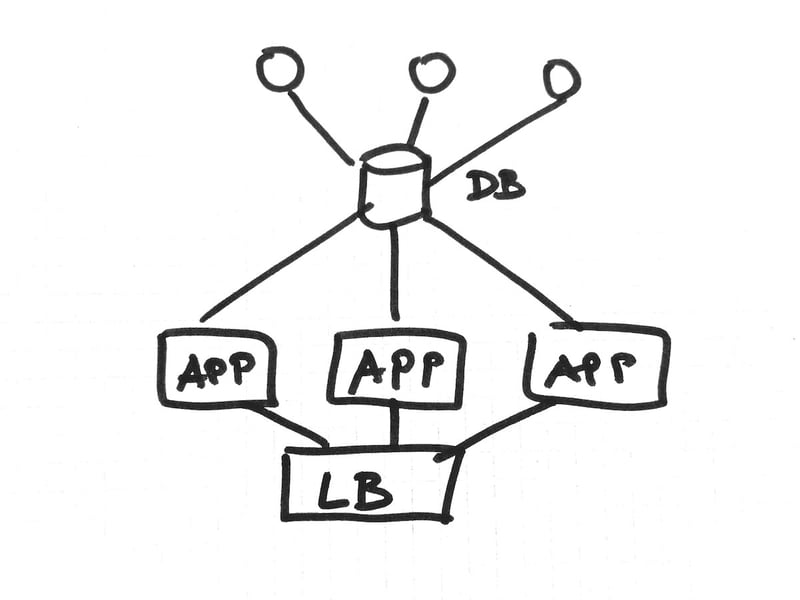
In this scenario the database master is single point of failure (SPoF) and when the database master breaks down the complete system is affected. We believe: old master-slave setup equals bad setup!
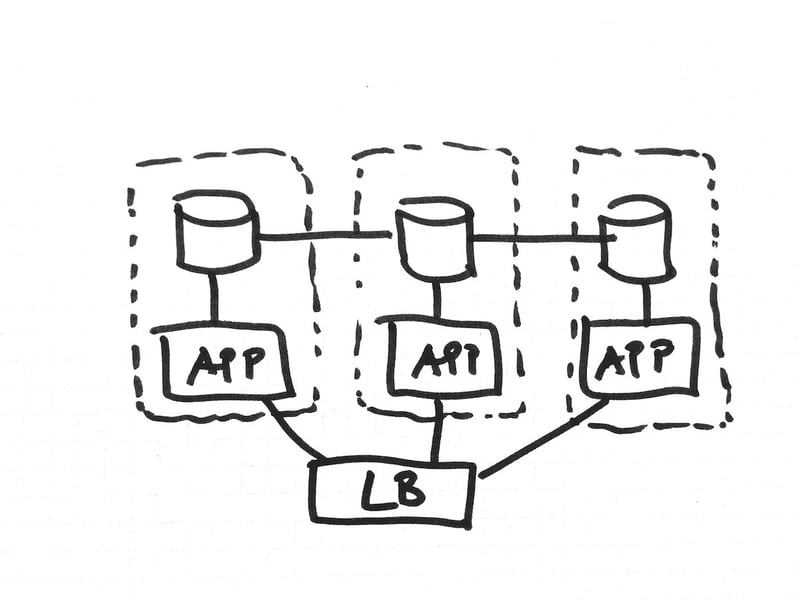
Shared Nothing Setup with Crate
In this example every deployed app server has its "own" database instance and there isn't a SPoF. A single node may fail - both app server and database instance - but as long as there is replication, nothing really bad will happen. Also, if you deploy an instance of Crate together with every new app server you will be able to dynamically scale up and down your database backend depending on your application needs.
Node Settings
Now that we know how the set up Crate with your application, it is time to look at the most important settings. Note that all settings are made on a node level. This is, again, due to the nature of the shared nothing architecture. If you have used Elasticsearch before, the following settings will sound familiar to you 😉
Cluster Name
Only instances with the same cluster name will join the cluster. So the simplest thing to prevent other nodes from joining your cluster is to give it a unique name.
cluster.NAME: my_special_applicationMulticast vs Unicast
By default multicast discovery is enabled. This has the advantage that you can fire up a few instances within the same network and they will discover each other automatically using the zen discovery module from Elasticsearch. Although there are benefits of multicast over unicast in performance and efficiency there are also drawbacks such as sending duplicates, no network congestion avoidance and best effort delivery. Moreover some network environments do not support multicast, so we strongly recommend to disable it and use unicast.
discovery.zen.ping.multicast.enabled: falseThen manually add the hosts of the cluster - either as IP or FQDN - to the list of unicast hosts:
discovery.zen.ping.unicast.hosts: - crate1.example.COM:4300 - crate2.example.COM:4300 - crate3.example.COM:4300To fine tune fault tolerance and discovery you can refer to the documentation of Elasticsearch's zen discovery module.
Master Node Election
Although all Crate nodes in a cluster are equal, there is one node elected as master. Like any other peer-to-peer system, nodes communicate with each other directly. However the master node is responsible for making changes to and publishing the global cluster state, as well as for delegating redistribution of shards when nodes join or leave the cluster. By default all nodes are eligible to become master. The settings minimum_master_nodes defines how many nodes need to be available in the cluster to elect a master. We highly recommend to set the minimum master nodes as follows:
minimum_master_nodes: (n / 2) + 1where N is the cluster size. That will ensure a full recovery of the cluster state. In our 3-node example it would mean that at least 2 nodes need to be started before they elect the master.
discovery.zen.minimum_master_nodes: 2If you want to take control which nodes are eligible to become master and which not, you can still do so. The crate.yml that is shipped with Crate.IO describes different possibilities in the 'Node' section.
Node Name
The only setting that differs on every node is the node name - what a surprise 😉 If this setting is omitted the node name is generated dynamically on startup.
node.NAME: crate1Full Example
To sum up the necessary settings a full working crate.yml configuration file would look similar like that:
node.NAME: crate1 cluster.NAME: my_special_application discovery.zen.ping.multicast.enabled: false discovery.zen.ping.unicast.hosts: - crate1.example.COM:4300 - crate2.example.COM:4300 - crate3.example.COM:4300 discovery.zen.minimum_master_nodes: 2Conclusion
We at Crate.IO try hard to make a multi-node setup of a database backend as frictionless as possible. The shared-nothing architecture enables a simple deployment process not only for one node, but also for two, three, 32, or how many nodes you want. With only the few settings described above you already have a reliable configuration for your production environment.
We'd love to hear your experience setting up multiple nodes with your projects. Let us know!