Because of its horizontally scalable shared-nothing architecture, the CrateDB open source database is well-suited for working with Kubernetes. Setting up a CrateDB cluster with Kubernetes can be done in just a few steps, and scaling up and down is straightforward – making the cluster particularly flexible. This step-by-step tutorial will show you how to get CrateDB and Kubernetes working together.
CrateDB is used for real-time machine data processing, monitoring, and analytics. The open source database is suited for applications with high volumes of machine data (like anomaly detection), log data (like e-commerce), network data (like capacity planning), and IoT/IIoT data (like smart manufacturing, smart home products, and fitness gear). However, this database is probably not what you want to use if you require strong (ACID) transactional consistency or highly normalized schemas with many tables and joins.
Kubernetes: From Pods, Controllers, and Services
Container orchestration is the management, deployment and scaling of containerized systems. Within a Kubernetes cluster, at least one node must act as the master; the number of slaves is arbitrary. The containers are intelligently distributed across all Kubernetes nodes. Different Kubernetes components run on different servers depending on their function, with diverse instances of these components coordinating across multiple machines. To define the state of a Kubernetes cluster, three concepts are particularly important: pods, controllers, and services.
Pods
A Kubernetes pod represents a single computing unit, and thus the basic building block of a Kubernetes system. A pod can be a single container or several that are closely linked. For example, if a web application is deployed, a pod executes a single instance of the application. Pods can be scaled up horizontally by adding replica pods, or scaled-down by removing them. More complex applications often require more than one container. All containers in a pod share a common network interface, and each container has access to the storage volumes assigned to the pod. The official CrateDB Docker Image is very suitable as a single container pod; a combination of several can create a CrateDB cluster of any size.
Controllers
Controllers are used to create pods and perform management functions. Controllers manage sets of pods according to specified specifications, and Kubernetes provides several controllers for different purposes. For example, containers should ideally be stateless to eliminate negative effects if a container is destroyed, rebuilt, or moved to another server. Stateless containers are suitable for web applications that maintain the state compared to an external database. However, databases themselves require persistent storage: data shouldn’t be lost just because a container is rescheduled. To solve this, Kubernetes provides the StatefulSet controller that assigns each pod a fixed identity and a fixed storage space, which are retained during restarts and rescheduling. The controller creates all pods within a stateful set from the same template, but they are not interchangeable.
Services
Since the pods can be stopped, started, and rescheduled to any Kubernetes node, their assigned IP addresses change over time. However, client applications shouldn’t have to deal with changing IP addresses. That's what Kubernetes services are for: they serve as static interfaces providing access to one or more pods. A typical service is a load balancer that distributes incoming queries across the entire cluster.
Setting up a Kubernetes Cluster
Minikube provides a solution for executing Kubernetes locally, giving you a simple and powerful method of getting started with Kubernetes. Minikube can work with various hypervisors as a VM runtime, and is set up for use with the popular cross-platform option VirtualBox by default. If a compatible hypervisor such as VirtualBox is installed on the system, Minikube recognizes it and automatically sets up the VM. In addition, the standard command line kubectl is required, which controls the Kubernetes Cluster manager.
Once these three components have been installed, the system can be started. By default, Minikube allocates 1GB of memory to the VM. This can be adjusted as required, as in the following example using 4GB, or “memory 4096”:
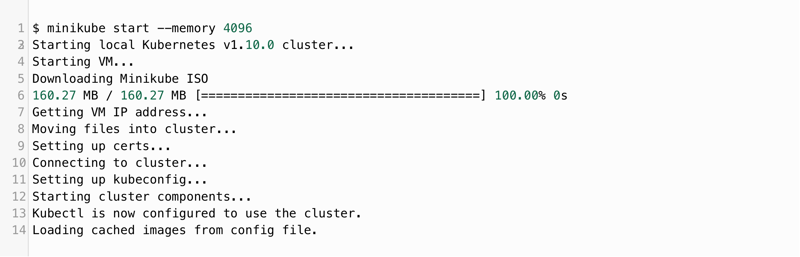
To prepare the newly created Kubernetes cluster for use, Minikube now automatically configures kubectl. This can be checked with the following command:

With the help of namespaces, Kubernetes divides the physical cluster into several areas. Technically speaking, no extra namespace needs to be created for the CrateDB cluster, but it’s advisable to keep an overview of the resources. The following command creates a new namespace:
 Now, if you query the existing namespaces, the newly created “crate” appears. While the default namespace is used if no other is specified, "kube-public" stands for all resources that are publicly available, and "kube-system" for the resources used internally by Kubernetes.

Setting up CrateDB Services
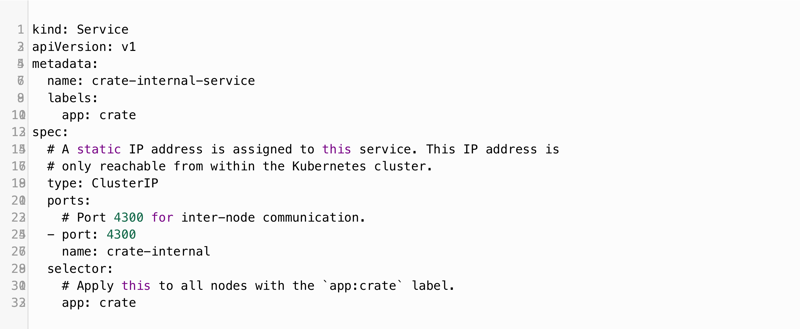
For CrateDB to function, each CrateDB node must be able to communicate with the other nodes in the cluster. To accomplish this, a Kubernetes service named crate-internal-service.yaml is created that displays on all pods that have the label “app: crate”. Labels are key/value pairs that stick to objects (such as pods) in order to give them attributes without changing their semantics. All CrateDB pods must be given the “app: crate” label. In addition, the following code defines a fixed IP address, and makes the service available on port 4300, the standard port that CrateDB uses for communication between the nodes.
Here is the configuration:
 Now the service can be created:

Kubernetes generates SRV records, which can be used to propagate the services of the cluster via DNS. In a later step, these can be used to set up CrateDB Unicast Host Discovery.
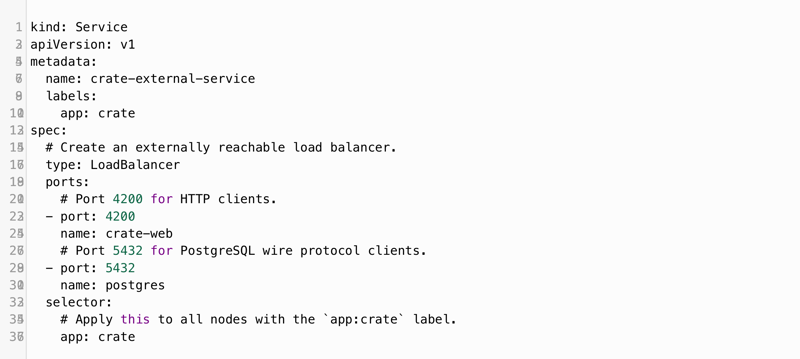
So that clients can also run queries on CrateDB, it must be possible to address the pods externally. For this purpose, an external service (crate-external-service) is created. Like the internal service, it refers to all pods with the “app: crate” label. Kubernetes will now create an external load balancer. Typically, such a service is only available with a hosted solution. In this case, however, Kubernetes uses the load balancer that the hosted solution provides.
This results in the following configuration:
 Now the external service can be created:

Defining the CrateDB Controller
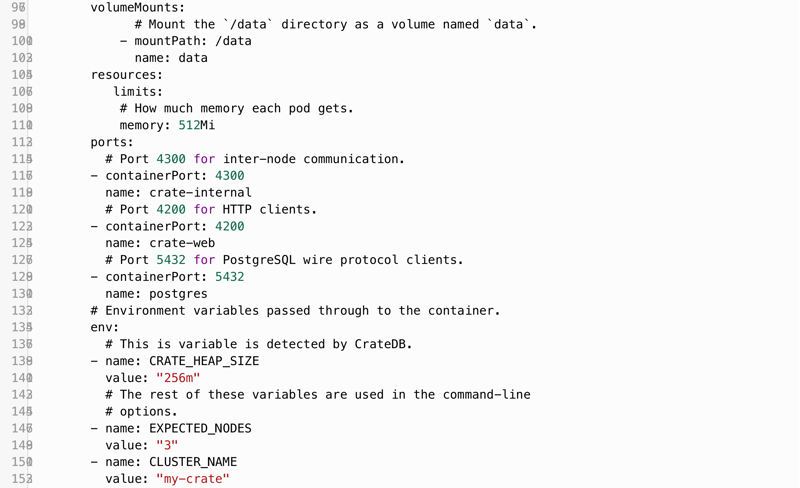
The CrateDB cluster interfaces have now been created with the services. Next, a controller is needed to assemble and manage the cluster. The configuration for crate-controller.yaml contains the following points:
- The Kubernetes controller creates pods: crate-0, crate-1, crate-2, etc.
- The controller creates a stateful set called “crate-set”. This requires three CrateDB pods with a fixed identity and persistent storage.
- Each pod has the “app: crate” label so that it can be addressed with the previously-created services.
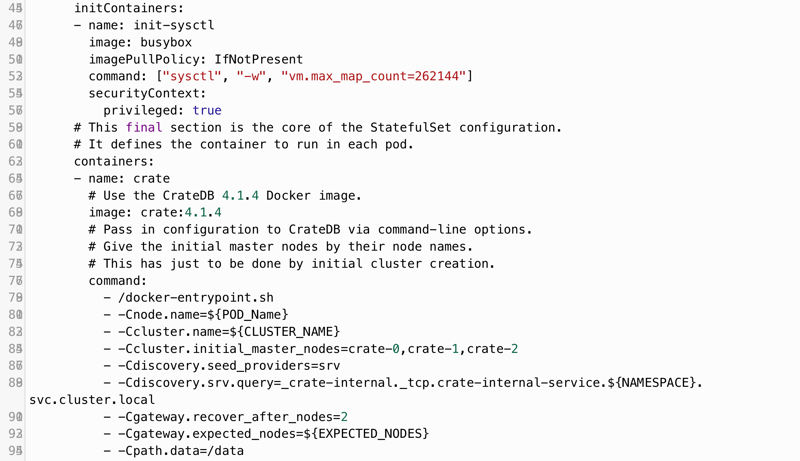
- Init containers (specialized containers that run within a pod in front of the app container) are used to configure the appropriate memory map limit so that CrateDB passes the bootstrap check. Such checks are carried out automatically in order to identify runtime problems.
- 512MB is allocated to each pod, so that the cluster uses 1.5GB of the total of 4GB. This leaves room for growth.
- The CrateDB containers that get each pod running are defined, Using version 4.1.4 of the CrateDB Docker image.
- The crate-internal-service creates the SRV records.
- Each pod provides various ports: port 4300 for communication within each node, port 4200 for HTTP clients, and port 5432 for PostgreSQL Wire Protocol clients.
- Environment Variables are defined. Here CrateDB configures the size of the usable memory (CRATE HEAP SIZE) as 256 MB, or 50 percent of the available memory.
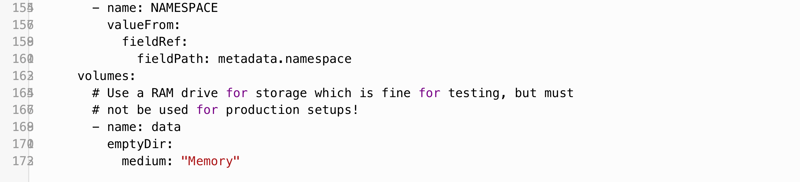
- To facilitate a quick start, RAM Drive serves as a temporary storage solution.

 After the configuration has been saved, the controller can be created:
 The StatefulSet controller produces each CrateDB pod individually. This process can be observed with the following command:
 Finally, the CrateDB cluster is fully initialized:

Accessing the CrateDB Cluster
Before anyone can access CrateDB, the external service must be running:

The “PORT(S)” column shows that Kubernetes port 31159 is connected to CrateDB port 4200 (HTTP) and Kubernetes port 31316 is connected to CrateDB port 5432 (PostgreSQL Wire Protocol). Due to a peculiarity of Minikube, the status of the external IP is still indicated with "pending". This requires a workaround.
First, the Minikube services are queried separately:
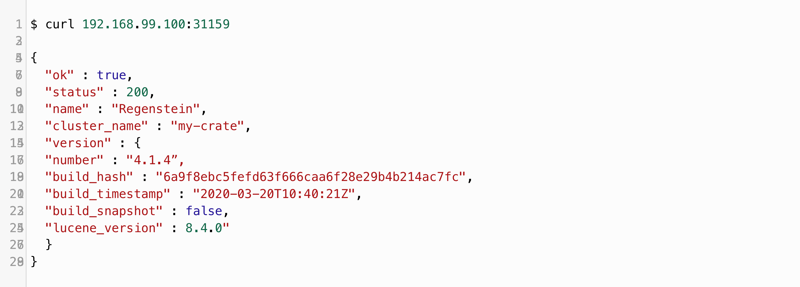
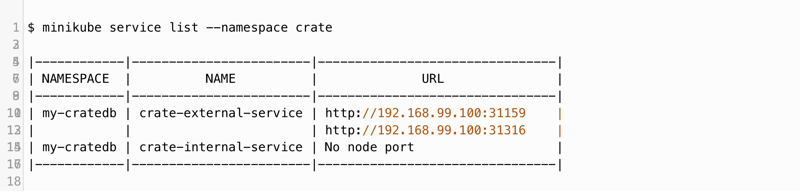 Two ports (192.168.99.100) are displayed, but both have HTTP as the specification. This is correct for the CrateDB HTTP port, but not for the PostgreSQL port. For the example described here, the HTTP port is 31159, and its functionality can be checked with a simple HTTP request. If the HTTP API response looks like this, everything works as expected:
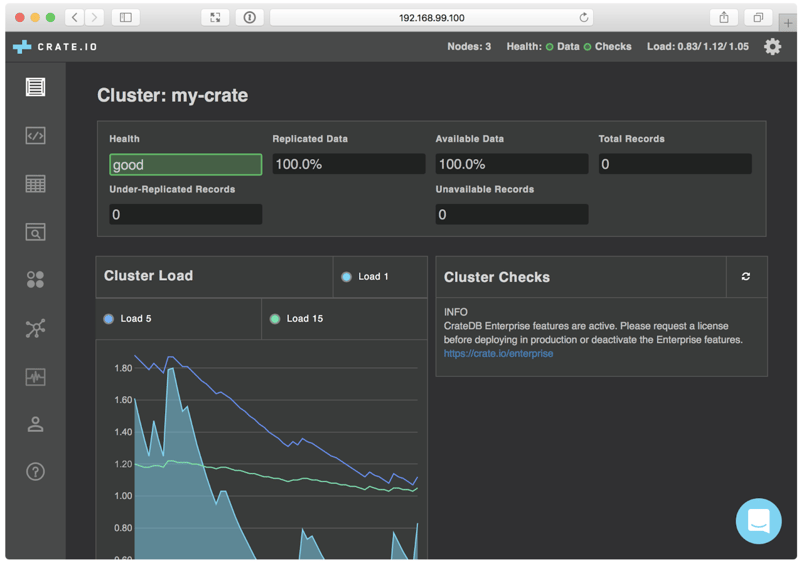
 The network address (in this tutorial it’s 192.168.99.100:31159) can now be copied into the browser. The following CrateDB Admin UI should appear:
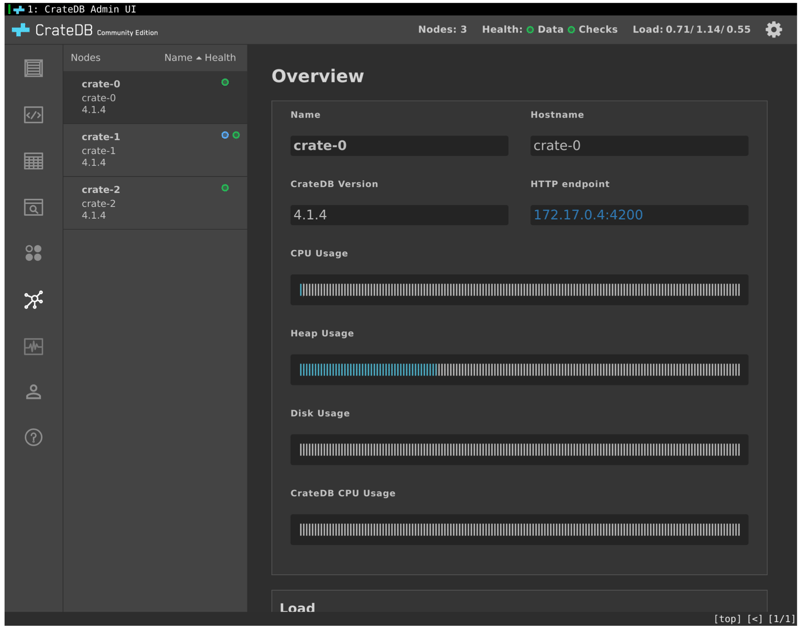
Clicking on the Cluster screen in the left navigation menu shows that the CrateDB cluster has three nodes as expected:
 In our "Getting Started" guide you can find more details on importing test data and creating queries.
Configuring Persistent Storage
In practice, you’ll want to be sure data in the cluster can survive typical power cycling scenarios (switching the hardware off and on again) without damage. So far, the last lines of the example controller file crate-controller.yaml look like this:

To set up persistent disk storage, Kubernetes provides the Persistent Volumes subsystem. It offers APIs for users and administrators that abstract away the details about how storage is provided from how it is consumed. One of these APIs is PersistentVolumesClaim. This instructs Kubernetes to request storage space from the underlying infrastructure. Kubernetes is agnostic about the implementation details.
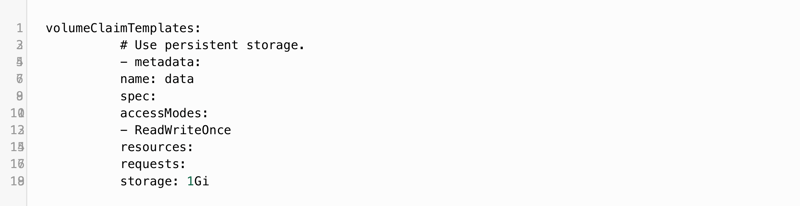
The part of the controller file described above (from volumes:) must now be replaced with a new configuration. In the following example, 1GB of persistent storage is requested per pod (in practice, other storage sizes can also be selected). The following config section belongs to the same indentation level as serviceName: "crate-set", meaning much further to the left:
 Unfortunately, the existing pods cannot be updated because the storage device is set to be changed. In the course of this change, all data that was previously written in CrateDB will be lost. The following commands show how the controller must be deleted and recreated:

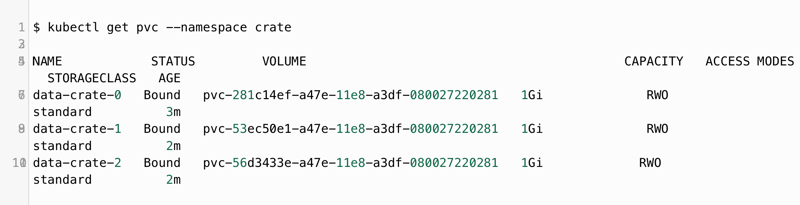
The following command can be used to verify whether 1GB is available for the pods:
Scaling Horizontally to Five Nodes
The ready-made CrateDB package, available for download from the Crate.io website, is limited to three nodes. Exceeding this limit leads to malfunctions. If you don't want to use the more powerful (but paid) enterprise version, can still expand your cluster by using CrateDB Community Edition “from the source.”
The following code can be used to build CrateDB:

The commit tag of the Git tag that corresponds to the version used must be inserted in place of “<TAG>”. As soon as the “gradlew” command has been successfully executed, the desired CrateDB CE release is stored as a compressed tarball archive in the app/build/distributions directory.
Horizontal scaling is now easy to implement by increasing or decreasing the number of replicas used.
In this example, the controller configuration initially defined three replicas:

The number can be changed while the cluster is running. This is particularly useful if, for example, it’s necessary to adapt rapidly to traffic peaks. Note that this procedure is not ideal for making permanent changes – the CrateDB Admin UI will display a corresponding warning.
The following changes are now made in the crate-controller.yaml file: The number of replicas is set from 3 to 5:

The rest is done automatically by CrateDB: the Expected_Nodes are set to the value 5, and both Minimum_Master_Nodes and the Recover_After_Nodes are adjusted. These values should be at least as large as half the cluster size plus 1. For this example, the system now sets them from 2 to 3.
Since this time only the "Replicas" and "Container" sections have been changed, the controller configuration can be updated directly:
 This process can also be observed with the kubectl command while it’s taking place. Kubernetes first ends the pods that were running, but then starts them again with the same identity and the same memory. Finally, the following result is visible:
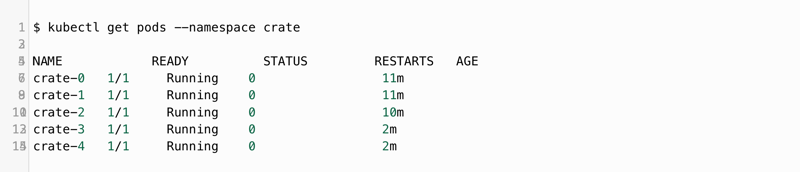 All five nodes can now also be seen in the Admin browser window.
Scaling Down: Removing a Node From the Cluster
As it pertains to CrateDB, there’s no difference whether a node should be removed from the cluster or whether it fails unexpectedly. In both cases, a node is removed from the cluster and CrateDB does the rest automatically. To test this, it’s advisable to load test data in the system first. Replicas and the Expected_Nodes can be set to 4 in the controller configuration, with everything else remaining as it is. The controller configuration is updated as follows:

Kubernetes is now making the changes pod by pod. While the cluster is in the middle of the roll-out – i.e. in an inconsistent status – some checks will fail. By default, replication routines are configured so that CrateDB can help itself if shards (horizontal partitions) need to be recreated. While the process continues, the Admin UI shows some warnings. When the process is complete, everything should be back in line, with the scaling down process concluded successfully.
CrateDB and Kubernetes work well as a team and make it possible to quickly set up a flexibly scalable cluster. Experimenting with test data can be useful when it comes to building experience, and gradually growing more familiar with using these technologies together.